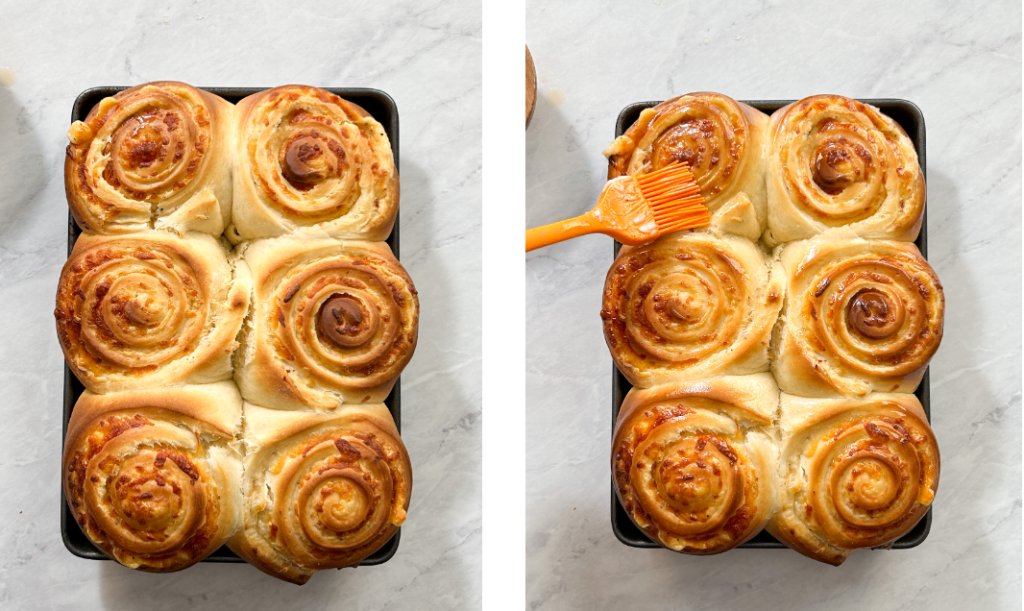
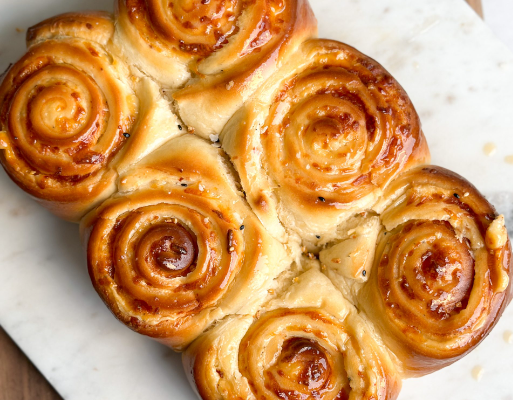
Imagine the irresistible combination of Cheesy Bread Rolls with a generous drizzle of honey butter—the perfect savory counterpart to classic Cinnamon Rolls. These rolls are crafted with a pillowy dough that’s so soft, you won’t even need a stand mixer. The secret is the rich cheese filling nestled inside, which melts perfectly as the rolls bake. And when they come out of the oven, they’re topped with warm honey butter that elevates the experience to something truly special. It’s like having a cheeseboard in the form of bread, combining the best of both worlds.
Inspired by an easy cinnamon roll recipe I’ve loved for years, I couldn’t resist creating a savory version that brings together my two favorite things: bread and cheese. This mix of flavors was sparked by a similar recipe I once tried from Cloudy Kitchen, and it quickly became a favorite. Of course, I had to put my own spin on it, making it a dish that’s both familiar and excitingly new.

INGREDIENTS REQUIRED
Bread Dough:
To create the ideal bread dough, you will need:
- Whole milk, warmed up to activate the yeast
- Granulated sugar for a touch of sweetness
- Active dry yeast or instant yeast for leavening
- All-purpose flour or plain flour as the base
- Salt to enhance the flavor
- Unsalted butter, softened to a tender texture
- Egg for richness (substitute with yogurt if you prefer an egg-free option)
Cheese Sauce:
For the rich and flavorful cheese sauce:
- Unsalted butter for the sauce base.
- Chopped garlic or minced garlic for added aroma and flavor
- To thicken the sauce, use all-purpose flour.
- Whole milk to create a creamy texture
- Salt, pepper, and chili flakes for seasoning
- Shredded cheese mix (a blend of mozzarella, cheddar, and gouda)
- For added creaminess, use cream cheese.
Honey Butter:
To finish with a sweet touch:
- Unsalted butter, melted for the base
- Honey for sweetness, mixed into the butter
SOFT AND CHEESY BREAD ROLLS RECIPE – PERFECT FOR SMALL BATCHES
Let’s break down the recipe step by step. While it’s not overly technical, it does require some attention to detail and a bit of time. Here’s how you can prepare these delicious Cheesy Bread Rolls with Honey Butter:
1. Make the dough
To make the dough, start by adding all the ingredients to the bowl of your stand mixer. Make sure the milk is warm to the touch, as the heat helps to activate the yeast. Although active dry yeast is often bloomed with the milk, I find that using an all-in-one dump method works just fine for me.
Attach the dough hook and knead the dough on a low speed, gradually increasing as it begins to come together. Initially, the dough will be quite sticky, but as you continue kneading for about 7-10 minutes, it will transform into a smooth, stretchy consistency. This happens as the gluten develops. Once the dough is ready and starts pulling away from the bowl’s edges, transfer it to a clean bowl lightly coated with oil. Cover the bowl with cling wrap and place it in a warm place—your oven with the oven light on works well. Allow the dough to rise and proof for 1 to 2 hours until it has doubled in size and springs back slightly when poked.

2. PREPARE THE CHEESE SAUCE
To make a delicious cheese sauce, start by melting butter in a nonstick pan over medium heat. Add garlic and sauté until it’s fragrant, which enhances the flavor of the sauce. Next, incorporate flour into the pan and mix it until it takes on a toasty aroma. This helps in creating a smooth base for your cheese sauce.

Slowly pour in milk and stir continuously to dissolve any lumps that might form. Add your chosen seasonings and keep stirring until the sauce begins to thicken. Lower the heat, then add the cheeses of your choice, stirring until they fully melt into the sauce. Once the cheese has melted, turn off the heat and taste the sauce, adjusting the seasoning if necessary. The sauce should be thick but still simple to stir. If it’s too thick, a splash of milk can help thin it out. Note that the sauce will cool down and thicken further as it sits.

3. ASSEMBLE THE ROLLS
To assemble the rolls, start by prepping an eighth-sheet pan with parchment paper. If you don’t have an eighth-sheet pan, any pan will do, though it might not be filled completely. Lightly dust a counter with flour and place the dough on it. Using a rolling pin, roll the dough out into a 12×14″ rectangle.

Spread the cheese sauce evenly over the dough with an offset spatula. For extra flavor, consider adding more cheese or toppings, such as caramelized onions or Everything But The Bagel seasoning.

Next, cut the rectangle into strips along the length, each about 2×14″. Carefully roll each strip into a cinnamon roll shape and arrange them on the lined eighth sheet pan.

Once all 6 rolls are positioned, let them proof in a warm spot for approximately 30-45 minutes. This will allow the rolls to puff up and reach their final, fluffy texture.

4. BAKE!
When it’s time to bake those delicious rolls, there’s something magical about the transformation that occurs in the oven. The key to achieving that perfect light golden color starts with a well-prepared dough. But don’t rush the process! Begin by allowing the rolls to fully rise, giving them the necessary time to become beautifully puffed. In the meantime, pre-heat your oven to a precise 375F, ensuring it’s ready to work its magic.
After around 20 minutes, your rolls should be ready to go in. Once placed in the oven, let them bake for about 20–22 minutes. A light golden hue will appear on them, indicating their perfect baking. When you spot that beautiful color, it’s time to remove them from the oven and enjoy their warmth and flavor.
5. BRUSH WITH HONEY BUTTER AND SERVE
There’s nothing quite like the moment when you brush your freshly baked rolls with honey butter. To get it just right, melt the butter until it’s smooth and creamy, then mix in the honey while it’s still warm. Using a pastry brush, generously coat each roll while they’re still hot from the oven. This step adds a perfect layer of sweetness that enhances the rolls’ flavor.

When you’re ready to serve these delightful treats, you’ll want to enjoy them while they’re still fresh. Although they’re best eaten right away, you can keep them stored in an airtight container in the fridge for several days. When reheating, use a toaster oven or your regular oven to bring back that just-baked texture, so they feel fresh again.

VARIATIONS
When it comes to adding your personal touch to this recipe, the possibilities are endless! You can easily play around with flavors and ingredients to create something truly unique.
- Incorporate more cream cheese and a sprinkle of Everything But The Bagel Seasoning.
- Spread some caramelized onions over the cheese sauce before rolling the dough for a rich, indulgent twist.
- To create a delightful corn and cheese variation, introduce some corn into the mix.
- Experiment with different cheeses to find your perfect combination.
These tweaks not only add depth to the dish but also give you the creative freedom to enjoy it in many delicious forms.
FREQUENTLY ASKED QUESTIONS
Is it possible to knead dough by hand if you don’t have a stand mixer?
Absolutely, you can knead this dough by hand, but it requires a bit of time and a lot of patience. One key thing to remember is to avoid the temptation to add extra flour during the process, as it might make the dough too dense. If you’re unsure of the technique, refer to my detailed instructions for a similar dough used in my cinnamon rolls recipe.
Kneading by hand allows you to connect with the dough, feeling it transform under your touch. Although it takes longer than mixing, the results are worth it. Just follow the steps carefully, and with a little patience, you’ll achieve the perfect consistency for your baked goods.
Can I substitute instant yeast for active dry yeast in baking?
Yes, you can absolutely use instant yeast instead of active dry yeast. The great thing about instant yeast is that it can be substituted in the same quantity as active dry yeast, and it doesn’t require you to activate it beforehand. This means you can simply throw all your ingredients together and start kneading right away.
Using instant yeast can streamline your baking process, making it more efficient. Since it’s more potent and dissolves quickly, you save time and effort without compromising on the dough’s quality.
What are the signs that bread rolls are fully baked?
To check if your rolls are done baking, look for a light golden color. You can also pick up a roll and inspect the edges where they are touching each other with a fork and knife. Ensure there are no specks of raw dough; if the rolls look cooked throughout, they’re ready to come out of the oven.
What’s the best way to keep cheesy bread rolls fresh?
To keep your cheesy bread rolls fresh, start by storing them in an airtight container at room temperature for up to 2 days. If you plan to keep them longer, simply move the rolls to the fridge. When you’re ready to enjoy them, heat them up in a toaster oven for a few minutes to bring back their just-baked warmth and flavor.


SMALL BATCH CHEESY BREAD ROLLS WITH HONEY BUTTER RECIPE
Ingredients
Bread:
- 160 g milk (⅔ cup), warm
- 40 g sugar (3 tbsp)
- 2 teaspoons yeast
- 325 g AP flour (2 ½ cup)
- 1 teaspoon salt
- 60 g unsalted butter, softened (¼ cup)
- 1 egg
Cheese sauce:
- 2 tbsp. unsalted butter (28g)
- 2 tbsp. all purpose flour (16g)
- 1 cup milk (240g)
- 1 tsp minced or chopped garlic
- ½ tsp each salt, pepper and chili flakes (add more to taste)
- ⅓ cup shredded mozzarella cheese + more to sprinkle (optional)
- ⅓ cup shredded cheddar cheese
- ⅓ cup shredded gouda cheese
- 2 tbsp. cream cheese (30g)
Honey butter:
- 2 tbsp. unsalted butter (28g)
- 2 tbsp. honey (40g)
Instructions
Bread:
- Place all ingredients in a bowl and use a stand mixer with a hook attachment to knead the dough for 7-10 minutes until it becomes smooth, soft, and stretchy, pulling away from the edges.
- Transfer the dough into a clean bowl lightly sprayed with oil. Cover it with cling wrap and set it in a warm, humid environment.
- Allow the dough to rest for 60-90 minutes until it has doubled in size.
Cheese sauce:
- Melt the butter in a nonstick saucepan over medium heat and sauté the garlic until it becomes fragrant.
- Stir in the flour and cook for one minute before slowly adding the milk and seasonings. Continue to cook, ensuring the mixture is smooth and free of lumps as it starts to thicken.
- Lower the heat to low and add the shredded cheese and cream cheese, stirring until fully combined.
- Taste the sauce and adjust the seasoning if needed. The consistency should be thick but not overly stiff, as it will continue to thicken as it cools down.
Assembly:
- Prep an eighth sheet pan by lining it with parchment paper and applying a thin layer of butter.
- When the dough has doubled in size, transfer it to a lightly floured surface and roll it into a 12×14" rectangle. Use an offset spatula to spread the cheese sauce evenly across the dough. If you like, sprinkle some mozzarella cheese over the top.
- Cut the rectangle into 6 thick strips, then carefully roll each strip tightly and neatly to form 6 individual rolls. Arrange these in the prepared pan.
- Let the rolls rise for a second time for approximately 30-45 minutes, until they look puffed up and ready for baking.
Baking & serving:
- As the second rise nears its end, preheat your oven to 375F.
- Bake the rolls for approximately 20–22 minutes until they reach a golden color.
- For the honey butter, melt butter and mix in honey. Brush this mixture onto the hot rolls with a pastry brush.
- Once brushed, serve the rolls and enjoy their delicious flavor.
